AWS Amplify + Vue.js + AppSync + Cognito +その他諸々でリアルタイム更新なサーバレスWebアプリをデプロイ
AWS Amplify + Vue.js + AppSync + Cognito +その他諸々でリアルタイム更新なサーバレスWebアプリをデプロイ:
昨年のServerless Advent CalendarにてAWS AmplifyでサーバレスWebアプリの構築という投稿を書きました。
この投稿では、AWS AmplifyというJavaScriptライブラリを使用して、Cognitoで認証を行い、API Gatewayに対してリクエストを行うというものでした。
従来のREST APIを使用したWebアプリであれば、この仕組みをベースとして構築することで、大抵のWebアプリは構築可能かと思います。
昨年のre:Invent 2017にて発表され、今年の4月にGAとなったGraphQLを使用したフルマネージドサービスであるAWS AppSyncが登場しました。
GraphQLとはや、AppSyncとはは、既に多くの記事で説明があるので、ここでは触れません。
このAppSyncが登場したことにより、サーバレスWebアプリの可能性が更に広がりました。
それは、リアルタイム更新が可能になったことです。
例えば、チャットを作る場合、従来のREST APIでは、GET /messages のようなAPIをポーリングし続け、表示を更新していく必要がありました。
しかし、AppSyncを使うことで、MQTT over Websocketsによりpub / sub構成が容易に構築でき、バックエンドのデータが更新されたと同時に、クライアントに対し更新情報がパブリッシュされるため、リアルタイムなデータ更新が実現できます。
そして更に今年のre:Invent 2018にて発表されたAWS Amplify Consoleを使用することにより、サーバーレスWebアプリケーションのCI/CDパイプラインの構築やデプロイを容易に行うことができるようになりました。
今回はこちらで紹介されているAWS Amplify + AppSync + Reactによる認証付きリアルタイムデータ更新Webアプリの構築を、Reactの代わりにVue.jsで行い、更にAWS Amplify Consoleによりデプロイまでを行いたいと思います。
また、コーディングはAWS Cloud9を使用して行います。
※今回Vue.jsを使用していますが、私自身Vue.jsをあまり使っておらず、直近の業務で使おうとしていたため、
ついでがてら選択した次第です。下記の内容にVue.jsの使い方として至らない点がありましたら、ご指摘ください。
※今回は原則としてオレゴンリージョン (us-west-2)を使用します
今回はお試しのためユニットテスト等は入れませんでした。
※ https://qiita.com/ultrasevenstar/items/2874ba37d72db605b487 こちらの記事のおかげで解決しました
ひとまずVue.jsは起動しました
上記により、/amplify-webapp/src/aws-exports.js が作成されます。
上記の流れで、schema.graphql を下記のように編集します
上記の設定を反映させます
上記までの作業だけで、なんと自動的にAppSyncへのスキーマ定義等が全て出来上がっています!
データの取得やフィルターなどの操作については、こちらを参考にしていただくとして、同様にデータの追加だけ行なってみましょう
左ペインからQueriesを選択し、再生マーク(実行ボタン)のボタンの下の欄に下記のように入力し、実行ボタンを押しましょう
追加されたようです。
DynamoDBのCity****なテーブルを確認してみると、しっかりデータが入っています
まずはamplifyライブラリのインストール
※執筆時点(2018/12/7のaws-amplify-vue 0.1.10には #2254の問題が存在しております。修正がされるまでは、 aws-amplify-vue@unstable をインストールすることで回避できます
ライブラリの読み込み
下記のように書き換えます
App.vueからデフォルトのVue.jsロゴを削除します
Cityコンポーネントを作成
Routerの修正
保存し実行結果を確認します
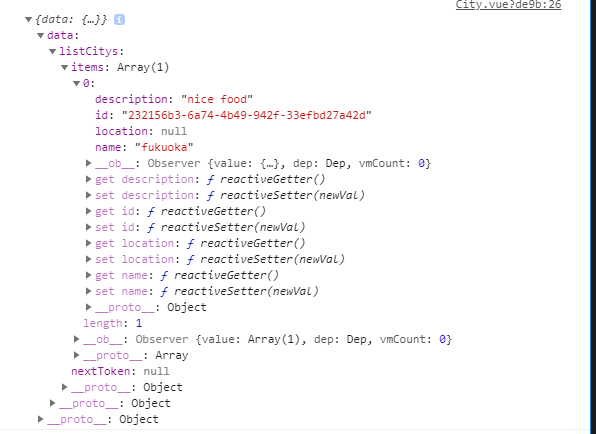
先程登録したデータがしっかり取得できていることが分かります。
続いては、サイト上からデータを追加をしましょう
上記のようにCity.vueを書き換えます。
データが追加できました。
続いてはデータの変更がされたら、その情報をキャッチして表示を更新する処理です
上記のように購読処理を追加しました。
先ほどと同じように、新しい情報をAppSyncのコンソール上から追加してみます。
その瞬間、追加した情報が更新されました!
同様の処理はウィンドウを2つ開いて情報を追加した場合でも確認できます。
サイトの機能としては最後にCognitoを使用したログイン認証を付けてみたいと思います
ユーザー認証を必須としてCityコンポーネントにアクセス出来るように修正します
保存して読み込み直すとあっという間にAmplifyのUI Componentによりログイン画面が表示されました
Create accountからサインアップを行い、ログインをします。
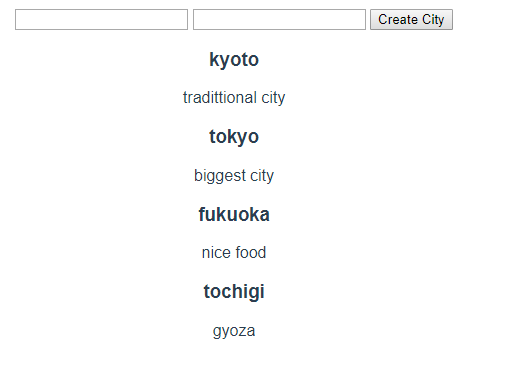
ログインが成功すると今までの画面が表示されました。
このままではログアウトができないので、ログアウト機能を実装します。
なんと1行追加するだけ!
無事サインアウトボタンが表示されました
それでは最後に作ったサイトをデプロイして公開したいと思います。
デプロイの方法としては、今までだとCode Buildなどを使ってS3にビルドしたファイル群を上げて、Cloud Frontで公開というのが王道だったのかなと思いますが、今回はre:Invent 2018で新たに発表されたAWS Amplify Consoleを使ってみたいと思います。
まずは作ったアプリケーションをリポジトリにコミット
続いて、AWSコンソールから、Amplifyを選択しましょう
DeployのGET STARTEDを選択
AWS Code Commitを選択して次へ
リポジトリとブランチを選択します
ビルド設定を行います。
自動的にフレームワークなどを読み取ってくれていて、基本的に変更する必要なさそうな感じです
確認して、デプロイを実行しちゃいましょう
デプロイパイプラインが作られました
数分待っていると下記のようになります
なんと、スクリーンショットまで表示されているじゃないですか!
そのスクリーンショットをクリックすると実際にデプロイされた画面を表示します
ちゃんとドメインが割り振られどこからでもアクセス可能なURLが発行されていることがわかります。
先程登録したユーザーでログインを行なってみると、しっかり認証され、Cityコンポーネントが表示されました
楽しくなってきたので調子に乗って、BASIC認証をかけてみたいと思います。
左ペインのアクセスコントロールを選択します
右上の「アクセスの管理」ボタンを選択すると下記の画面になります。
Access settingの欄を「制限 - パスワードが必須です」を選択し、ユーザー名とパスワードを入れましょう
再度アクセスし直してみましょう
ちゃんとBASIC認証が掛かってます!
おまけ
こちらの画面の、ブランチ名(master)を選択してみましょう
検証の欄には、なんといくつかの端末向けにレンダリングされた結果が表示されているではないですか!
いかがだったでしょうか?
AmplifyとAppSyncを使用すると、こんなにも簡単にリアルタイム更新が出来るサーバーレスWebアプリをつくることが出来ます
そして、新たに発表されたAmplify Consoleを使うとデプロイまでもあっという間に行うことができます。
そして気づいたかもしれませんが、サーバーレスの代名詞的な存在であるLambdaを今回は全く使うことなく、
それどころかバックエンドのスクリプトを1文字も書くことなくリアルタイム更新なDynamoDBをデータストアとした
アプリケーションを作ってしまうことが出来ました。
これは控えめに言って、革命です
これからの時代を担うだろうGraphQLのフルマネージドサービス「AWS AppSync」と、
それらの設定や構築などのサーバーレスであろうとやらなければいけなかったはずのオペレーションまでも
ほぼ無意識にやってくれる、まさにサーバーレスなツール「AWS Amplify」を是非積極的に使っていきたいと思いました。
昨年までのAWS Amplify
昨年のServerless Advent CalendarにてAWS AmplifyでサーバレスWebアプリの構築という投稿を書きました。この投稿では、AWS AmplifyというJavaScriptライブラリを使用して、Cognitoで認証を行い、API Gatewayに対してリクエストを行うというものでした。
従来のREST APIを使用したWebアプリであれば、この仕組みをベースとして構築することで、大抵のWebアプリは構築可能かと思います。
AppSync登場!
昨年のre:Invent 2017にて発表され、今年の4月にGAとなったGraphQLを使用したフルマネージドサービスであるAWS AppSyncが登場しました。GraphQLとはや、AppSyncとはは、既に多くの記事で説明があるので、ここでは触れません。
このAppSyncが登場したことにより、サーバレスWebアプリの可能性が更に広がりました。
それは、リアルタイム更新が可能になったことです。
例えば、チャットを作る場合、従来のREST APIでは、GET /messages のようなAPIをポーリングし続け、表示を更新していく必要がありました。
しかし、AppSyncを使うことで、MQTT over Websocketsによりpub / sub構成が容易に構築でき、バックエンドのデータが更新されたと同時に、クライアントに対し更新情報がパブリッシュされるため、リアルタイムなデータ更新が実現できます。
更に進化するAWS Amplify
そして更に今年のre:Invent 2018にて発表されたAWS Amplify Consoleを使用することにより、サーバーレスWebアプリケーションのCI/CDパイプラインの構築やデプロイを容易に行うことができるようになりました。
今回のテーマ
今回はこちらで紹介されているAWS Amplify + AppSync + Reactによる認証付きリアルタイムデータ更新Webアプリの構築を、Reactの代わりにVue.jsで行い、更にAWS Amplify Consoleによりデプロイまでを行いたいと思います。また、コーディングはAWS Cloud9を使用して行います。
※今回Vue.jsを使用していますが、私自身Vue.jsをあまり使っておらず、直近の業務で使おうとしていたため、
ついでがてら選択した次第です。下記の内容にVue.jsの使い方として至らない点がありましたら、ご指摘ください。
やってみた
準備
※今回は原則としてオレゴンリージョン (us-west-2)を使用します- CodeCommit に適当なリポジトリを作成
- Cloud9 に m4.largeのインスタンスで環境を作成
- 起動したCloud9用EC2インスタンスに、Administrator権限のRoleを割り当てる
- 下記のコマンドでCodeCommitをIAM認証にて取得できるようにする
$ git config --global credential.helper '!aws codecommit credential-helper $@'
$ git config --global credential.UseHttpPath true
- リポジトリのclone
$ git clone https://git-codecommit.us-west-2.amazonaws.com/v1/repos/amplify-webapp
- nodeバージョンをアップデート
$ nvm install v8.14.0
$ nvm alias default v8.14.0
- vue-cli のインストール
$ npm i -g @vue/cli
$ npm install -g @vue/cli-init
Vue.js プロジェクトの作成
- 初期化
$ cd amplify-webapp  # CodeCommitのリポジトリ名
$ $ vue init webpack .
? Generate project in current directory? Yes
? Project name amplify-webapp
? Project description A Vue.js project
? Author
? Vue build standalone
? Install vue-router? Yes
? Use ESLint to lint your code? No
? Set up unit tests No
? Setup e2e tests with Nightwatch? No
? Should we run `npm install` for you after the project has been created? (recommended) npm
- Cloud9でVue.jsを起動できるように修正
build/webpack.dev.conf.js
- host: HOST || config.dev.host,
- port: PORT || config.dev.port,
+ host: '0.0.0.0',
+ port: '8080',
+ disableHostCheck: true,
- ひとまずVue.jsの初期状態で起動できるか確認
$ npm run dev
- Preview -> Preview Running Application で起動したページをプレビューできます
ひとまずVue.jsは起動しました
Amplify CLIを使用したセットアップ
$ npm install -g @aws-amplify/cli
$ amplify init

? Choose your default editor: None
? Choose the type of app that you're building javascript
Please tell us about your project
? What javascript framework are you using vue
? Source Directory Path:  src
? Distribution Directory Path: dist
? Build Command:  npm run-script build
? Start Command: npm run-script serve
Using default provider awscloudformation

For more information on AWS Profiles, see:
https://docs.aws.amazon.com/cli/latest/userguide/cli-multiple-profiles.html

? Do you want to use an AWS profile? Yes
? Please choose the profile you want to use default

$ amplify push
まずはAppSyncを使った簡易的な表示を構築
$ amplify add api

? Please select from one of the below mentioned services GraphQL
? Provide API name: amplifywebapp
? Choose an authorization type for the API API key
? Do you have an annotated GraphQL schema? No
? Do you want a guided schema creation? Yes
? What best describes your project: Single object with fields (e.g., “Todo” with ID, name, description)
? Do you want to edit the schema now? Yes
Please manually edit the file created at /home/ec2-user/environment/amplify-webapp/amplify/backend/api/amplifywebapp/schema.graphql
? Press enter to continue
schema.graphql
type City @model {
  id: ID!
  name: String!
  description: String
  location: String
}
$ amplify push

| Category | Resource name | Operation | Provider plugin   |
| -------- | ------------- | --------- | ----------------- |
| Api      | amplifywebapp | Create    | awscloudformation |
? Are you sure you want to continue? Yes

GraphQL schema compiled successfully. Edit your schema at /home/ec2-user/environment/amplify-webapp/amplify/backend/api/amplifywebapp/schema.graphql
? Do you want to generate code for your newly created GraphQL API Yes
? Choose the code generation language target javascript
? Enter the file name pattern of graphql queries, mutations and subscriptions src/graphql/**/*.js
? Do you want to generate/update all possible GraphQL operations - queries, mutations and subscriptions Yes
データの追加
上記までの作業だけで、なんと自動的にAppSyncへのスキーマ定義等が全て出来上がっています!データの取得やフィルターなどの操作については、こちらを参考にしていただくとして、同様にデータの追加だけ行なってみましょう
左ペインからQueriesを選択し、再生マーク(実行ボタン)のボタンの下の欄に下記のように入力し、実行ボタンを押しましょう
mutation create {
    createCity(input:{
    name:"fukuoka"
    description:"nice food"
  }){
    id name description
  }
}
追加されたようです。
DynamoDBのCity****なテーブルを確認してみると、しっかりデータが入っています
クライアント側からデータを取得する
まずはamplifyライブラリのインストール$ npm install aws-amplify aws-amplify-vue --save
ライブラリの読み込み
下記のように書き換えます
src/main.js
import Vue from 'vue'
import App from './App'
import router from './router'
import Amplify from 'aws-amplify'
import aws_exports from './aws-exports'
import { components } from 'aws-amplify-vue'

Vue.config.productionTip = false

Amplify.configure(aws_exports)

/* eslint-disable no-new */
new Vue({
  el: '#app',
  router,
  components: {
    App,
    ...components
  },
  template: '<App/>'
})
src/App.vue
<template>
  <div id="app">
    <router-view/>
  </div>
</template>

<script>
export default {
  name: 'App'
}
</script>

<style>
#app {
  font-family: 'Avenir', Helvetica, Arial, sans-serif;
  -webkit-font-smoothing: antialiased;
  -moz-osx-font-smoothing: grayscale;
  text-align: center;
  color: #2c3e50;
  margin-top: 60px;
}
</style>
component/City.vue
<template>
  <div class="cities">
    <template v-for="(city,index) in cities">
      <div key={{index}}>
        <h3>{{city.name}}</h3>
        <p>{{city.description}}</p>
      </div>
    </template>
  </div>
</template>

<script>
import Vue from 'vue'
import { API, graphqlOperation} from "aws-amplify"
import { listCitys } from "../graphql/queries"

export default {
  name: 'City',
  data () {
    return {
      cities: []
    }
  },
  mounted: async function () {
    let cities = await API.graphql(graphqlOperation(listCitys));
    console.log(cities);
    this.cities = cities.data.listCitys.items;
  }

}
</script>

<!-- Add "scoped" attribute to limit CSS to this component only -->
<style scoped>
</style>
router/index.js
import Vue from 'vue'
import Router from 'vue-router'
import City from '@/components/City'

Vue.use(Router)

export default new Router({
  routes: [
    {
      path: '/',
      name: 'City',
      component: City
    }
  ]
})
先程登録したデータがしっかり取得できていることが分かります。
データの更新
続いては、サイト上からデータを追加をしましょうCity.vue
<template>
  <div class="cities">
    <div class="createCity">
      <input v-model="name" name="name" />
      <input v-model="description" name="description" />
      <button v-on:click="createCity()">Create City</button>
    </div>
    <template v-for="city in cities">
      <div>
        <h3>{{city.name}}</h3>
        <p>{{city.description}}</p>
      </div>
    </template>
  </div>
</template>

<script>
import Vue from 'vue'
import { API, graphqlOperation} from "aws-amplify"
import { listCitys } from "../graphql/queries"
import { createCity } from "../graphql/mutations"

export default {
  name: 'City',
  data () {
    return {
      cities: [],
      name: "",
      description: ""
    }
  },
  mounted: async function () {
    let cities = await API.graphql(graphqlOperation(listCitys))
    console.log(cities)
    this.cities = cities.data.listCitys.items
  },
  methods: {
    createCity: async function () {
      if ((this.name === "") || (this.description === "")) return
      const city = {name: this.name, description: this.description}
      try {
        const cities = [...this.cities, city]
        this.cities = cities
        this.name = "";
        this.description = "";
        await API.graphql(graphqlOperation(createCity, {input: city}))
        console.log('success')
      } catch (error) {
        console.log('error: ', error)
      }
    }
  },

}
</script>

<!-- Add "scoped" attribute to limit CSS to this component only -->
<style scoped>
</style>
データが追加できました。
データの購読
続いてはデータの変更がされたら、その情報をキャッチして表示を更新する処理ですCity.vue
<template>
  <div class="cities">
    <div class="createCity">
      <input v-model="name" name="name" />
      <input v-model="description" name="description" />
      <button v-on:click="createCity()">Create City</button>
    </div>
    <template v-for="city in cities">
      <div>
        <h3>{{city.name}}</h3>
        <p>{{city.description}}</p>
      </div>
    </template>
  </div>
</template>

<script>
import Vue from 'vue'
import { API, graphqlOperation} from "aws-amplify"
import { listCitys } from "../graphql/queries"
import { createCity } from "../graphql/mutations"
import { onCreateCity } from "../graphql/subscriptions"

export default {
  name: 'City',
  data () {
    return {
      cities: [],
      name: "",
      description: ""
    }
  },
  mounted: async function () {
    let cities = await API.graphql(graphqlOperation(listCitys))
    console.log(cities)
    this.cities = cities.data.listCitys.items

    API.graphql(
      graphqlOperation(onCreateCity)
    ).subscribe({
      next: (eventData) => {
        console.log('eventData: ', eventData);
        const city = eventData.value.data.onCreateCity;
        const cities = [...this.cities.filter(content => {
          return ((content.name !== city.name) && (content.description !== city.description));
        }), city];
        this.cities = cities;
      }
    });
  },
  methods: {
    createCity: async function () {
      if ((this.name === "") || (this.description === "")) return
      const city = {name: this.name, description: this.description}
      try {
        const cities = [...this.cities, city]
        this.cities = cities
        this.name = "";
        this.description = "";
        await API.graphql(graphqlOperation(createCity, {input: city}))
        console.log('success')
      } catch (error) {
        console.log('error: ', error)
      }
    }
  },

}
</script>

<!-- Add "scoped" attribute to limit CSS to this component only -->
<style scoped>
</style>
先ほどと同じように、新しい情報をAppSyncのコンソール上から追加してみます。
その瞬間、追加した情報が更新されました!
同様の処理はウィンドウを2つ開いて情報を追加した場合でも確認できます。
認証機能の追加
サイトの機能としては最後にCognitoを使用したログイン認証を付けてみたいと思います$ amplify add auth Using service: Cognito, provided by: awscloudformation The current configured provider is Amazon Cognito. Do you want to use the default authentication and security configuration? Yes, use the default configuration. $ amplify push
router/index.js
import Vue from 'vue'
import Router from 'vue-router'
import City from '@/components/City'
import { components, AmplifyEventBus } from 'aws-amplify-vue';
import Amplify, * as AmplifyModules from 'aws-amplify';
import { AmplifyPlugin } from 'aws-amplify-vue';

Vue.use(Router)
Vue.use(AmplifyPlugin, AmplifyModules);

let user;

getUser().then((user, error) => {
  if (user) {
    router.push({path: '/'})
  }
})

AmplifyEventBus.$on('authState', async (state) => {
  if (state === 'signedOut'){
    user = null;
    router.push({path: '/auth'})
  } else if (state === 'signedIn') {
    user = await getUser();
    router.push({path: '/'})
  }
});

function getUser() {
  return Vue.prototype.$Amplify.Auth.currentAuthenticatedUser().then((data) => {
    if (data && data.signInUserSession) {
      return data;
    }
  }).catch((e) => {
    return null
  });
}

const router = new Router({
  routes: [
    {
      path: '/',
      name: 'City',
      component: City,
      meta: { requiresAuth: true}
    },
    {
      path: '/auth',
      name: 'Authenticator',
      component: components.Authenticator
    }
  ]
});

router.beforeResolve(async (to, from, next) => {
  if (to.matched.some(record => record.meta.requiresAuth)) {
    user = await getUser();
    if (!user) {
      return next({
        path: '/auth',
        query: {
          redirect: to.fullPath,
        }
      });
    }
    return next()
  }
  return next()
})

export default router
Create accountからサインアップを行い、ログインをします。
ログインが成功すると今までの画面が表示されました。
このままではログアウトができないので、ログアウト機能を実装します。
City.vue
~~~省略~~~~
  <div class="cities">
    <amplify-sign-out></amplify-sign-out>
    <div class="createCity">
~~~省略~~~~
無事サインアウトボタンが表示されました
デプロイ
それでは最後に作ったサイトをデプロイして公開したいと思います。デプロイの方法としては、今までだとCode Buildなどを使ってS3にビルドしたファイル群を上げて、Cloud Frontで公開というのが王道だったのかなと思いますが、今回はre:Invent 2018で新たに発表されたAWS Amplify Consoleを使ってみたいと思います。
まずは作ったアプリケーションをリポジトリにコミット
$ git add .
$ git commit -am "create app"
$ git push
DeployのGET STARTEDを選択
AWS Code Commitを選択して次へ
リポジトリとブランチを選択します
ビルド設定を行います。
自動的にフレームワークなどを読み取ってくれていて、基本的に変更する必要なさそうな感じです
確認して、デプロイを実行しちゃいましょう
デプロイパイプラインが作られました
数分待っていると下記のようになります
なんと、スクリーンショットまで表示されているじゃないですか!
そのスクリーンショットをクリックすると実際にデプロイされた画面を表示します
ちゃんとドメインが割り振られどこからでもアクセス可能なURLが発行されていることがわかります。
先程登録したユーザーでログインを行なってみると、しっかり認証され、Cityコンポーネントが表示されました
楽しくなってきたので調子に乗って、BASIC認証をかけてみたいと思います。
左ペインのアクセスコントロールを選択します
右上の「アクセスの管理」ボタンを選択すると下記の画面になります。
Access settingの欄を「制限 - パスワードが必須です」を選択し、ユーザー名とパスワードを入れましょう
再度アクセスし直してみましょう
ちゃんとBASIC認証が掛かってます!
おまけ
こちらの画面の、ブランチ名(master)を選択してみましょう
検証の欄には、なんといくつかの端末向けにレンダリングされた結果が表示されているではないですか!
まとめ
いかがだったでしょうか?AmplifyとAppSyncを使用すると、こんなにも簡単にリアルタイム更新が出来るサーバーレスWebアプリをつくることが出来ます
そして、新たに発表されたAmplify Consoleを使うとデプロイまでもあっという間に行うことができます。
そして気づいたかもしれませんが、サーバーレスの代名詞的な存在であるLambdaを今回は全く使うことなく、
それどころかバックエンドのスクリプトを1文字も書くことなくリアルタイム更新なDynamoDBをデータストアとした
アプリケーションを作ってしまうことが出来ました。
これは控えめに言って、革命です
これからの時代を担うだろうGraphQLのフルマネージドサービス「AWS AppSync」と、
それらの設定や構築などのサーバーレスであろうとやらなければいけなかったはずのオペレーションまでも
ほぼ無意識にやってくれる、まさにサーバーレスなツール「AWS Amplify」を是非積極的に使っていきたいと思いました。
コメント
コメントを投稿